
| Weather Fact: | A rainbow was visible for 6 hours (from 9am to 6pm) at Wetherby, Yorkshire (UK) on 14 March 1994. This is rare as most rainbows last for only a few minutes. |
In this section:
The Earth's Rotation - a visual demonstration Make your own Thermometer Weather Reporter - Temperature Temperature Quiz

For most countries along the equator, the temperature and the amount of sunlight they receive are constant throughout the year.
This constant light and energy source means that Equator countries do not experience Seasons like we do here in the UK.
To understand HOW and WHY the equator receives this constant amount of sunlight, students must learn about the earth's rotation.
You will need:
- 1 x Football / Basketball
- 1 x Large Rubber Band
- 2 x Sticky Dots
- 1 x Torch
- Lots of willing and interested kids!
For the most effective demonstration, darken the room. Take the rubber band, and place it around the middle of the ball. Stick 1 dot at the top of the ball (representing the North Pole), and one at the bottom of the ball (representing the South Pole).
Choose one student the hold the ball, placing their fingers at the designated Pole points. The 'Poles' should be pointing straight up.
Choose one student to hold the torch. Stand them a few feet from the ball, and ask them to point the light directly at the line of the equator.
Students will notice that the light striking the ball is most intense at the equator, and is less intense at the Pole points.
Ask another student to slowly spin the ball, and students will see that the light remains intense on the equator as the ball turns.
Next, ask the student holding the ball to tilt the North then the South pole closer to the flashlight to demonstrate the effects of the change in the angle of the Earth's axis relative to the Sun as the Earth travels round the Sun in the course of the year. Point out that throughout the cycle the areas near the equator line receive the most intense light.
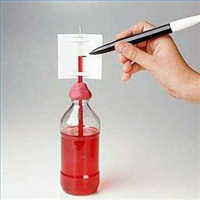
Making a thermometer is a simple and fun way to teach children about temperature.
Although this homemade thermometer will not measure exact degrees, it does allow children to experiment with how changes in temperature affect a thermometer.
The effects of heat and cold that move the elements in a traditional thermometer will cause the same changes in this experimental thermometer.
You will need:
- 1 x Clear Plastic Bottle
- Rubbing Alcohol
- Tap Water
- 1 x Clear Plastic Drinking Straw
- Permanent Marker
- Red Food Colouring
- Modeling Clay
- Fill the bottle 1/4 full with water
- Pour rubbing alcohol into the bottle until it is half full
- Add a drop or two of red food colouring
- Place the straw in the bottle, but do not let it touch the bottom.
- Press a small amount of modelling clay on top of the straw and use the clay to seal the edges of the bottle's top. The clay will hold the straw in place and prevent it from touching the bottom of the bottle.
- On the side of the bottle, use a permanent marker to label how high the liquid inside your thermometer is at room temperature.
- Change the bottle's environment to see how temperature affects the thermometer inside.
- Place the bottle inside a bowl of ice and let it cool down. The mixture inside will go down and take up less space in colder temperatures. Make a mark on the side of the bottle to register how low the liquid has fallen.
- Place the bottle inside a bowl of warm water. As the temperature around the bottle increases, the liquid inside will expand. Because the liquid no longer fits in the bottom of the bottle, it will move higher up the straw. Make a mark on the side of the bottle to register how high the liquid has risen.
This is a great activity for developing lots of different skills, and gets students interacting with the ClimeMET weather data, improving organisational and observational skills, and allows them to start interpreting data and plotting results on a series of graphs.
Students will be responsible for measuring and recording the Temperature for a period of 1 week, and reporting their findings to the class. This activity will help to encourage children to work together as a team and assign roles.
You will need:
- ClimeMET Temperature Data
- Data Sheet / Excel Spreadsheet
- Ruler
- Pencils
- Graph Paper
Stage 1: Gather the Data
Show the class how to check the current outdoor temperature using the ClimeMET Learning Suite. Once the children understand how to check the temperature, elect 2 class members to observe and record the temperature each day. The temperature should be read and recorded at the same time each day to ensure consistent results.
Collect temperature readings for 5 days, and record the information on a worksheet.
At the end of the 5 days, the students should be presented with the temperature record, and the next stage of the project begins.
Stage 2 - Plot the data
Ask all the children in the class to prepare a graph using the following conditions:
- X Axis = Days of the Week
- Y Axis = Temperature
Depending on the scale of temperature, vary the frequency of degree. For example, if there is only a 3 or 4 °C variance, then increments of 1°C will be sufficient, or you could choose increments of 2°C or 5°C accordingly.
Children can then plot the temperature readings on their graph, either connecting the records for a line graph, or creating columns for a bar graph.
Stage 3 - Interpret the Data - Advanced Learning
Using the temperatures the children have gathered, they can find the mean (average), mode (most frequent) and the median (middle) temperature of the week.
Ask the children to arrange the results in number order, low to high.
- Mode: The mode is the number that occurs most often in the list.
- Median: To find the median, cross off the numbers on either end of the list until the middle number is all that is left! Median!
- Mean: To find the mean or average temperature of the week, add all the numbers together, and divide by the total number of numbers, which in this case should be 5 if the students recorded the temperature for an entire week.
Stage 4 - Weather Forecasting
Meteorologists look for patterns in the weather that help them forecast for the future. A forecast is coming up with a reasonable guess based on what information is known. Students can do the same thing!
After having charted the temperature for a week, look at the pattern and predict the next day's temperature. Discuss how close the predictions were the next day.
Cross Curricular LearningMathsStudents will have to work with incremental numbers, and understand the concept of rounding up and down.
Cross Curricular LearningICT Students will be using ICT skills, interacting with the data and navigating their way around the ClimeMET website.
Create a Classroom Quiz using the Temperature Topic pages. There are tons of things to learn throughout these pages - from spelling and comprehension to bizarre facts and stats.
Using the Highlighted Glossary terms, Factual Charts and Mini Case Studies you can challenge the class to a quiz. Make the quiz more interesting by splitting the class into teams, or awarding star tokens to the highest scorer.
Spelling:
There are lots of new words associated with this topic area. Here are just a few:
| Temperature | Summer | Freeze |
| Thermometer | Autumn | Equator |
| Fahrenheit | Winter | Climate |
| Celsius | Average | Orbit |
| Degree | Record | Hemisphere |
| Season | Sunshine | High |
| Spring | Snow | Low |
Facts and Stats
Use the Facts & Stats section to create Flash Cards for the children. Give them 1 or 2 facts to learn, and ask them to tell the class about their interesting fact!
Further Learning
Expand on the Equator topic by introducing some of the countries that lie on the Equator line. There are 13 in all:
- Ecuador
- Colombia
- Brazil
- Sao Tome and Principe
- Gabon
- Republic of Congo
- Democratic Republic of Congo
- Uganda
- Kenya
- Somalia
- Maldives
- Indonesia
- Kiribati
Ask the class to pick a country, and learn more about the climate and weather they have there, and discover some of the High and Low weather records for the region.